
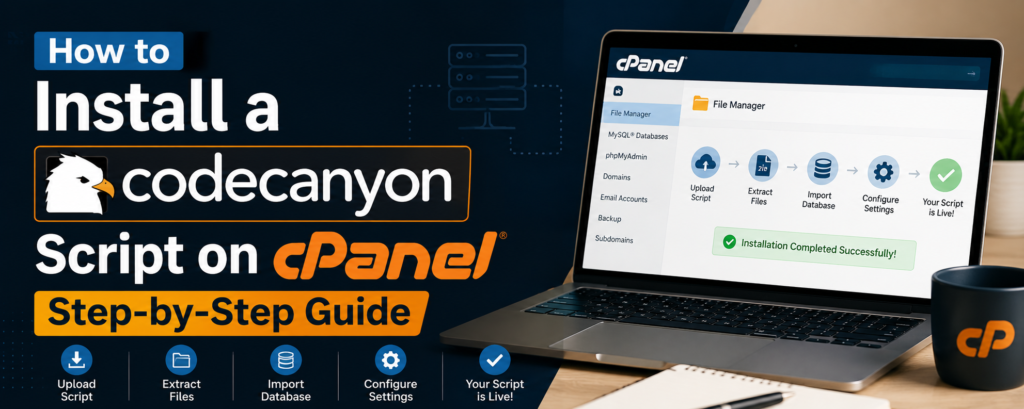
How to Install a CodeCanyon Script on cPanel: Step-by-Step Guide
I remember staring at my first CodeCanyon purchase like it was written in ancient Greek.
I had just spent $47 on a PHP script that promised to do everything I needed for my freelance business. The download link arrived. I clicked. A ZIP file landed on my desktop. And then I froze.
Where do I upload this? What is a database? Why does everyone keep saying “public_html” like I should know what that means?
After three hours of YouTube videos, two frustrated support tickets, and one accidental site crash, I finally figured it out. The process was not complicated. I was missing a clear map.
In this guide, I will walk you through exactly how to install any CodeCanyon PHP script on cPanel hosting. No developer experience required. No confusing jargon. Just step-by-step instructions that work.
What You Need Before You Start
Let me save you the headache I experienced. Before you touch anything, make sure you have these four things ready.
A cPanel hosting account. Most shared hosting plans include cPanel. Bluehost, Hostinger, SiteGround, and many others use it. You need your login URL, username, and password.
Your CodeCanyon script ZIP file. Download this from your CodeCanyon “Downloads” page. Do not attempt to upload the ZIP file directly to your server—this almost never works the way you expect.
The script documentation. Every CodeCanyon purchase includes a documentation file. Read it. I know it is boring. I know you want to skip it. Do not skip it. Different scripts have different requirements, and the documentation tells you exactly what your specific script needs.
A text editor. Notepad works. Notepad++ is better. VS Code is best. You will need this to edit configuration files.
Step 1: Log in to our cPanel Dashboard
Open your browser. Type in your cPanel login URL. Your hosting provider sent this to you in your welcome email. It usually looks something like https://yourdomain.com:2083 or https://cpanel.yourdomain.com.
Enter your username and password. Click Log in.
If you cannot find your login details, check your email for “Welcome to [Hosting Company]” or “Your hosting account is ready.” The information is there. If you still cannot find it, contact your hosting provider’s support. They deal with this every day.
Step 2: Create a Database (If Your Script Needs One)
Most PHP scripts require a database. Think of this as a storage unit where your script keeps all its information—user accounts, posts, settings, everything.
Here is how to create one.
In cPanel, find the “Databases” section. Click “MySQL Databases.”
Create the database. Enter a name for your database. Something like “myscript_db” or “portfolio_db.” Click “Create Database.” Remember this name exactly as you typed it.
Create a database user. Scroll down to “MySQL Users.” Enter a username and a strong password. Click “Create User.” Write down this username and password. You will need them in Step 5.
Add the user to the database. Scroll to “Add User to Database.” Select the user and database you just created. Click “Add.” On the next screen, check “ALL PRIVILEGES.” Click “Make Changes.”
You now have a database. It took less than two minutes
Write down these three pieces of information right now:
- Database name:
(what you entered) - Database username:
(what you entered) - Database password:
(the password you set)
Step 3: Upload Your Script Files via cPanel File Manager
This is where most beginners get stuck. Do not upload the ZIP file directly. Here is the right way.
In cPanel, find the “Files” section. Click “File Manager.”
A pop-up will ask which directory to open. Select “Web Root” and check “Show Hidden Files.” Click “Go.”
You will see a list of folders. The folder you care about is public_html. This is the root directory of your website. Whatever you put here appears at yourdomain.com .
Inside public_html, you have two options:
Option A: Install in the root. If you want your script to run at yourdomain.com, upload files directly into public_html.
Option B: Install in a subfolder. If you want your script to run at yourdomain.com/toolname, create a new folder inside public_html (click “New Folder” and name it something like “tool”).
Either way, click into your target directory.
Click the “Upload” button at the top of File Manager. A file picker will appear. Select the ZIP file you downloaded from CodeCanyon. Wait for the upload to complete (green checkmark appears).
Go back to File Manager. Find your uploaded ZIP file. Right-click it and select “Extract.” A pop-up will ask where to extract. The current directory is fine. Click “Extract Files.”
Delete the ZIP file after extraction. It is no longer needed and takes up space.
Step 4: Set File Permissions (If Required)
Some scripts need certain folders to be writable. This allows the script to save uploaded files, generate caches, or write logs.
The documentation will tell you if this is required. Look for phrases like “set permissions to 755” or “make this folder writable.”
Here is how to do it. In File Manager, navigate to the folder mentioned in the documentation. Right-click the folder. Select “Change Permissions.” Enter the number (usually 755 for folders, 644 for files). Click “Change Permissions”.
If the documentation does not mention permissions, skip this step. Most modern scripts handle permissions automatically.
Step 5: Configure the Database Connection File
Now we connect your script to the database you created in Step 2.
Most PHP scripts include a configuration file. Common names include config.php, database.php, settings.php, or .env. The documentation will tell you which file to edit and where it is located.
In File Manager, navigate to the file. Right-click it and select “Edit” or “Code Edit.” A warning pop-up will appear. Click “Edit” to continue.
Look for lines that look like this:
text
$db_host = 'localhost';
$db_user = 'your_username';
$db_pass = 'your_password';
$db_name = 'your_database';
Replace your_username, your_password, and your_database with the information you wrote down in Step 2. Most scripts use localhost as the host. Leave that as is unless the documentation says otherwise.
Click “Save Changes.” Close the editor.
Step 6: Run the Installation Wizard
The hardest part is done. Now you get to see your script come to life.
Open a new browser tab. Type in your website URL. If you installed it in a subfolder, include that folder name. For example:
- Root installation:
https://yourdomain.com - Subfolder installation:
https://yourdomain.com/foldername
Press Enter.
Most CodeCanyon scripts automatically detect that they have not been installed yet. They will redirect you to an installation wizard, usually found at install.php or setup.php .
The wizard will ask you a few questions:
License code or purchase code. Find this in your CodeCanyon “Downloads” page. Next to your purchased script, click “License Certificate” or “Download Purchase Code.” Copy the code. Paste it into the wizard.
Database information. The wizard may ask for database details again. This is normal. Enter the same information from Step 2. Some scripts have a “Test Connection” button. Use it. If the test fails, double-check your database name, username, and password.
Admin account. Create your admin username, email, and password. Write these down. You will need them to log into your script after installation.
Site settings. Enter your site name, site URL, and other basic information.
Click “Install” or “Finish Setup.” Wait a few seconds. You should see a success message.
Step 7: Secure Your Installation
After installation, you have one critical security step.
Navigate to your script’s installation directory in File Manager. Look for the install folder or files like install.php and setup.php. Delete them.
Why? If someone else finds these files, they could reinstall your script and wipe out all your data. Most scripts warn you about this. Some even refuse to work until the installation files are removed.
Some scripts automatically rename or delete these files after installation. If they are already gone, you are done.
Check your script’s documentation for additional security recommendations. Common steps include changing the default admin URL, enabling two-factor authentication, and setting up regular backups.
Common Installation Problems and How to Fix Them
Even with perfect steps, things can go wrong. Here are the most common issues and their fixes.
White screen after installation. This usually means a PHP error is occurring, but error display is turned off. Check your script’s documentation for debugging instructions. Or check your hosting’s error logs (in cPanel, look for “Errors” or “Error Logs”).
“Cannot connect to database” error. Your database credentials are wrong. Double-check the database name, username, and password. Also, confirm that the database user has been added to the database with ALL PRIVILEGES.
“500 Internal Server Error.” This generic error can have many causes. First, check file permissions. Most files should be 644. Folders should be 755. Second, check that your PHP version meets the script’s requirements. You can change the PHP version in cPanel under “Software” > “Select PHP Version”.
“The archive contains a virus” warning. Some cPanel security plugins falsely flag CodeCanyon archives. If you see this, upload the extracted files via FTP instead of File Manager. The security scan sometimes does not check FTP uploads the same way
The installation wizard does not appear. You may have missed the configuration file step. Navigate to yourdomain.com/install.php or yourdomain.com/setup.php manually. If that does not work, check the documentation for the correct installation URL.
Script asks for ionCube or other extensions. Some scripts require additional PHP extensions. In cPanel, go to “Software” > “Select PHP Version.” Check the boxes for required extensions (ionCube, curl, PDO, etc.). Click “Save”.
What to Do If You Get Completely Stuck
I have been there. You try everything. Nothing works. You are ready to give up.
Here is what to do.
Contact the script author. Every CodeCanyon script includes support from the developer. Look for a “Support” link on the script’s CodeCanyon page. Many authors offer installation help as part of their support.
Check the comments section. Other buyers may have encountered the same problem. Read the script’s CodeCanyon comments. The answer is often there.
Hire a freelancer. If you are truly stuck, paying 30to100 for professional installation is worth it. You save hours of frustration. Upwork and Fiverr have many freelancers who specialize in CodeCanyon script installation.
Post-Installation Checklist
Your script is installed. Before you celebrate, run through this checklist.
- Delete the install folder or install.php file
- Log in to your script’s admin panel using the credentials you created
- Change the default admin password if you used a temporary one
- Configure your site title, logo, and basic settings
- Set up email sending (SMTP) if your script has email features
- Configure any cron jobs required by the script (check documentation)
- Create a backup of your working installation
- Test every major feature to confirm everything works
My Final Thoughts
Installing a CodeCanyon script on cPanel feels intimidating the first time. By the third time, you will do it in your sleep.
The process is always the same: create a database, upload files, edit the config file, run the installer, and delete the install folder. Every script follows this pattern. Only the specific file names and folder locations change.
Take your time. Read the documentation. Write down your database credentials. And do not panic when something goes wrong—almost every installation has at least one hiccup.
The $47 script I struggled with for three hours now runs a key part of my freelance business. That frustration was temporary. The tool I built has paid for itself hundreds of times over.
You have got this. One step at a time.
Have you installed a CodeCanyon script before? What was the most challenging part for you? Leave a comment below and share your experience.